Extending Houdini
Houdini’s Python API is implemented with the hou module. Each node is implemented as a class that inherits from a hierarchy of classes.
For example, a null SOP is a hou.SopNode inheriting from multiple other classes
flowchart TD
   A[hou.NetworkItem]-->B(hou.NetworkMovableItem)-->C(hou.Node)-->D(hou.OpNode)-->E(hou.SopNode)
This means that you can access any methods from the superclasses from the current subclass. However, there are some exceptions to this with regards to PDG and USD contexts.
Accessing a PDG class with Python
In order to access a pdg.Node object, you have to use the getPDGNode() method on a hou.TopNode
Credits to the following forum post that helped me discover this:
pythonscript to press button on node per work item | Forums | SideFX
https://www.sidefx.com/forum/topic/73862/?page=1#post-312290
top_node = hou.node('/obj/topnet1/genericgenerator1') #inherits hou.TopNode class
pdg_node = top_node.getPDGNode()                      #inherits pdg.Node class
for work_item in pdg_node.workItems:
    print(work_item)

#    use top_node.getSelectedWorkItem()
#    and top_node.setSelectedWorkItem(id)
#    to get and set the current work item
#  THIS ONLY WORKS IF THE NODE IS ALREADY COOKED OR ELSE workItems will return NONE
#  WHICH YOU CAN COOK USING top_node.cookWorkitems() method
Sending Geometry across Houdini Processes with SharedMemory
Passing over geometry from one Houdini to another can be accomplished with file caches, but if you want to achieve a high-speed temporary transfer of geometry, you can push the geometry data as bytes into shared memory (RAM) and pick it up on the other client. Python SOP on the server Houdini: MAKE SURE MAINTAIN STATE IS TICKED OR THE PYTHON INTEPRETER IS KILLED
node = hou.pwd()
geo = node.geometry()

geo_data = geo.data()

print(len(geo_data))
from multiprocessing import shared_memory

shm = shared_memory.SharedMemory(create=True,size = len(geo_data))

for i,byte in enumerate(geo_data):
    shm.buf[i] = byte

#print(geo_data)
#print("-----------------GAPGAP---------------------")
#print(shm.buf.tobytes())

print(shm.name)
Python SOP on the client Houdini:
node = hou.pwd()
geo = node.geometry()

mem_name = 'wnsm_301104a4'

from multiprocessing import shared_memory
eshm = shared_memory.SharedMemory(name=mem_name)
data = eshm.buf.tobytes().rstrip(b"\x00")

geo.load(data)
Opening a socket and sending out data from Houdini\
On a shelf tool
import socket
import threading


def start_server():
    # Create a socket object
    server_socket = socket.socket(socket.AF_INET, socket.SOCK_STREAM)
    host = "127.0.0.1"  # Localhost
    port = 5000  # Port number

    # Bind the socket to the host and port
    server_socket.bind((host, port))
    print(f"Socket server started on {host}:{port}")

    # Start listening for connections
    server_socket.listen(5)
    print("Waiting for a connection...")

    while True:
        # Accept a new connection
        client_socket, addr = server_socket.accept()
        print(f"Connection received from {addr}")

        # Receive data from the client
        data = client_socket.recv(1024).decode("utf-8")
        print(f"Message received: {data}")

        # Close the connection
        client_socket.close()
        break


# Start the server in a separate thread to keep Houdini responsive
server_thread = threading.Thread(target=start_server, daemon=True)
server_thread.start()

print("Server thread started. Houdini is still responsive.")
Receiving the data with a Python SOP
node = hou.pwd()
geo = node.geometry()
import time

print(time.time())

import socket

client_socket = socket.socket(socket.AF_INET, socket.SOCK_STREAM)
host = "127.0.0.1"
port = 5000

# Connect to the server

client_socket.connect((host, port))

    # Send a message
message = "Hello from client!"
client_socket.send(message.encode("utf-8"))

    # Close the connection
client_socket.close()
# Add code to modify contents of geo.
# Use drop down menu to select examples.
Adding a function into Houdini’s Event Loop using Callbacks
def LoopingEvent():
	print("LoopingEvent has executed")
	pass

hou.ui.addEventLoopCallback(LoopingEvent)

# To stop the eventLoop
hou.ui.removeEventLoopCallback(LoopingEvent)
Accessing a USD class with Python
To access a pxr.Usd.Stage object and use the USD functions in Houdini, you have to call the stage() method on a hou.LopNode.
Nvidia Python USD API Documentation
https://docs.omniverse.nvidia.com/kit/docs/pxr-usd-api/latest/pxr/Usd.html#pxr.Usd.Stage
Important
Take note, not all nodes that you create within Solaris is
hou.LopNode, for example, the USD Render ROP which is unique to Solaris, does not inherit fromhou.LopNode.
Example Code to get a Usd.Prim and attribute
node = hou.pwd()
stage = node.stage()
#Now that we have a pxr.Usd.Stage object
#We can start calling methods from the Usd-API

usdPrim = stage.GetPrimAtPath("/geo")
usdAttribute = usdPrim.GetAttribute("example")
value= usdAttribute.Get()
Incremental Save
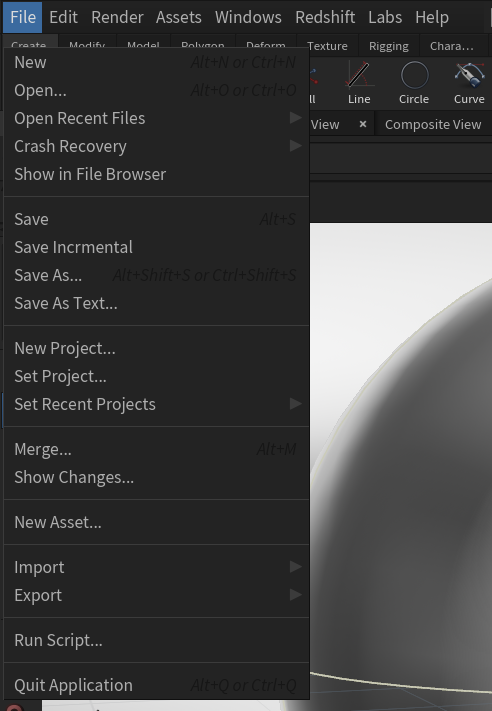
So Houdini has an incremental save feature but with the default customization you can only choose to either go with incremental saves or to overwrite your saves as the only behavior. If you want to have a selectable option for incremental and overwriting your saves, you have to create a script. Luckily its only two lines.
import hou #not needed but I like to include it
hou.hipFile.saveAndIncrementFileName()
Save this script and add it to your File menu using the following method and you are set.
Adding a Script to Houdini’s built-in main menus
You can control any menu element in Houdini from the xml configuration files located in your Houdini installation’s folder, official documentation here.
But the summary is, after you create your script add this to your MainMenuCommon.xml
<mainMenu>
  <addScriptItem id="h.saveinc">
	 <parent>file_menu</parent>
	 <label>Save Incrmental</label>
	 <scriptPath>$Pipelinetools/scripts/saveIncremental.py</scriptPath>
	 <scriptArgs></scriptArgs>
	<insertAfter>h.save</insertAfter>
  </addScriptItem>
</mainMenu>
<parent> tag indicates which menu the new item will live under
<insertAfter> indicates the placement of of the additional item using the id of the element to insert after
The ids and parent menu names can be found under HFS/houdini/MainMenuCommon.xml
Collect Files (How to package a project)
So, I was making my own script for packaging a project using Python as an excuse to try out and learn Python within Houdini, but I also found out that there’s a script made by Aeoll that already accomplishes what I wanted to make, and also included features that I did not think to include, so here it is.
Regardless, here’s the code that I had typed that will serve as reference for me on how to find specific node types:
import hou
#returns all instances of nodes of type 'file'
#use hou.node('path-to-node').type() to return
#the type of a specific node you need
fileN = hou.sopNodeTypeCategory().nodeType('file').instances()
for node in fileN:
		#evalParm evaluates the current value of the selected parm
		#this means that $F or any expressions will return as the
		#current value, eg. on frame 86 $F will return 86
    path = node.evalParm('file')
    print(path.replace('$HIP',''))
This script will print out all directories from the ‘file’ parameter on all file nodes in the Houdini project.